Advanced CLI Tasks
This is a list of advanced tasks to perform with the MAAS CLI. See MAAS CLI on how to get started.
Set the default kernel boot options
To set kernel boot options that will be applied to all machines:
maas $PROFILE maas set-config name=kernel_opts value='$KERNEL_OPTIONS'
Specify kernel boot options for a machine
To specify kernel boot options for an individual machine a tag needs to be created:
maas $PROFILE tags create name='$TAG_NAME' \
    comment='$COMMENT' kernel_opts='$KERNEL_OPTIONS'
For example:
maas $PROFILE tags create name='nomodeset' \
    comment='nomodeset kernel option' kernel_opts='nomodeset vga'
The tag must then be assigned to the machine in question. This can be done with the web UI or with the CLI. For the latter, see MAAS CLI - common tasks.
If multiple tags attached to a node have the kernel_opts defined, the first
one (ordered alphabetically) is used.
Set a default minimum HWE kernel
To set a default minimum HWE kernel for all machines:
maas $PROFILE maas set-config name=default_min_hwe_kernel value=$HWE_KERNEL
Set a minimum HWE kernel for a machine
To set the minimum HWE kernel on a machine basis:
maas $PROFILE machine update $SYSTEM_ID min_hwe_kernel=$HWE_KERNEL
Set a specific HWE kernel during machine deployment
To set a specific HWE kernel during the deployment of a machine:
maas $PROFILE machine deploy $SYSTEM_ID distro_series=$SERIES hwe_kernel=$HWE_KERNEL
MAAS verifies that the specified kernel is available for the given Ubuntu release (series) before deploying the node.
Update node hostname and power parameters
To update the hostname and power parameters of a (KVM) node based on its system ID:
maas $PROFILE machine update $SYSTEM_ID \
    hostname=$HOSTNAME \
    power_type=virsh \
    power_parameters_power_address=qemu+ssh://ubuntu@$KVM_HOST/system \
    power_parameters_power_id=$HOSTNAME
Assign a network interface to a fabric
This task is made easier with the aid of the jq utility. It filters the
maas command (JSON formatted) output and prints it in a desired way. This
allows one to quickly view and compare data. Go ahead and install it:
sudo apt install jq
In summary, an interface is indirectly assigned to a fabric by assigning it to a VLAN. First we need to gather various bits of data.
List some information on all machines:
maas $PROFILE machines read | jq ".[] | \
    {hostname:.hostname, system_id: .system_id, status:.status}" --compact-output
Example output:
{"hostname":"node1","system_id":"dfgnnd","status":4}
{"hostname":"node2","system_id":"bkaf6e","status":6}
{"hostname":"node4","system_id":"63wqky","status":6}
{"hostname":"node3","system_id":"qwkmar","status":4}
Note: An interface can only be edited when the corresponding machine has a status of 'Ready'. This is numberically denoted by the integer '4'.
List some information for all interfaces on the machine in question (identified by its system id 'dfgnnd'):
maas $PROFILE interfaces read dfgnnd | jq ".[] | \
    {id:.id, name:.name, mac:.mac_address, vid:.vlan.vid, fabric:.vlan.fabric}" --compact-output
Example output:
{"id":8,"name":"eth0","mac":"52:54:00:01:01:01","vid":0,"fabric":"fabric-1"}
{"id":9,"name":"eth1","mac":"52:54:00:01:01:02","vid":null,"fabric":null}
List some information for all fabrics:
maas $PROFILE fabrics read | jq ".[] | \
    {name:.name, vlans:.vlans[] | {id:.id, vid:.vid}}" --compact-output
Example output:
{"name":"fabric-0","vlans":{"id":5001,"vid":0}}
{"name":"fabric-1","vlans":{"id":5002,"vid":0}}
{"name":"fabric-2","vlans":{"id":5003,"vid":0}}
This example will show how to move interface '8' (on machine 'dfgnnd') from 'fabric-1' to 'fabric-0'. Based on the gathered information, this will consist of changing the interface's VLAN from '5002' to '5001':
maas $PROFILE interface update dfgnnd 8 vlan=5001 >/dev/null
Verify the operation by relisting information for the machine's interface:
maas $PROFILE interfaces read dfgnnd | jq ".[] | \
    {id:.id, name:.name, mac:.mac_address, vid:.vlan.vid, fabric:.vlan.fabric}" --compact-output
The output shows that the interface is now on fabric-0:
{"id":8,"name":"eth0","mac":"52:54:00:01:01:01","vid":0,"fabric":"fabric-0"}
{"id":9,"name":"eth1","mac":"52:54:00:01:01:02","vid":null,"fabric":null}
Install a rack controller
To install and register a rack controller with the MAAS:
sudo apt install maas-rack-controller
sudo maas-rack register
Note: The register command is not required when the rack controller is being added to a system that already houses an API server.
You will be asked for the URL of the region API server. If you provide a
hostname ensure it is resolvable. Next, you will be prompted for the secret key
that is stored in file /var/lib/maas/secret on the API server.
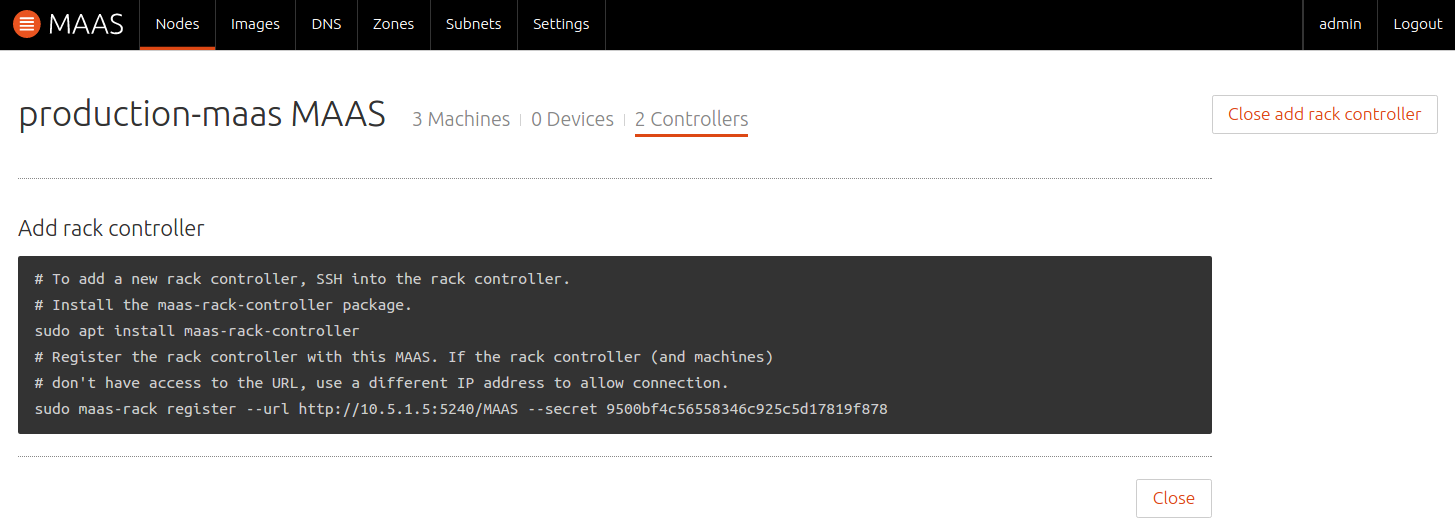
You can get the above information from the web UI by visiting the 'Nodes' page, then the Controller tab, and clicking the button 'Add rack controller'. Here is an example of what you may see:

Based on the above, then, we could have also entered:
sudo maas-rack register --url http://10.5.1.5:5240/MAAS --secret 9500bf4c56558346c925c5d17819f878
List rack controllers
To list all rack controllers registered with the region:
maas $PROFILE rack-controllers read | grep hostname | cut -d '"' -f 4
Set the default storage layout
To set the default storage layout for all nodes:
maas $PROFILE maas set-config name=default_storage_layout value=$LAYOUT_TYPE
For example, to set the default layout to Flat:
maas $PROFILE maas set-config name=default_storage_layout value=flat
Important: The new default will only apply to newly-commissioned nodes.
See [Storage][storage] for more details on MAAS storage features.
Set a storage layout
An administrator can set a storage layout for a node with a status of 'Ready' like this:
maas $PROFILE machine set-storage-layout $SYSTEM_ID storage_layout=$LAYOUT_TYPE [$OPTIONS]
For example, to set an LVM layout where the logical volume has a size of 5 GB:
maas $PROFILE machine set-storage-layout $SYSTEM_ID storage_layout=lvm lv_size=5368709120
All storage sizes are currently required to be specified in bytes.
Warning: This will remove the configuration that may exist on any block device.
Create an alias (CNAME) record in DNS
An administrator can set a DNS Alias (CNAME record) to an already existing DNS entry of a node.
mass $PROFILE dnsresource-records create fqdn=$HOSTNAME.$DOMAIN rrtype=cname rrdata=$ALIAS
For example, to set webserver.maas.io to alias to www.maas.io:
maas $PROFILE dnsresource-records create fqdn=webserver.maas.io rrtype=cname rrdata=www
Create a Mail Exchange pointer record in DNS
An administrator can set a DNS Mail Exchange pointer record (MX and value) to a domain.
maas $PROFILE dnsresource-records create fqdn=$DOMAIN rrtype=mx rrdata='10 $MAIL_SERVER.$DOMAIN'
For example, to set domain.name managed by MAAS to have an MX record and that you own the domain:
maas $PROFILE dnsresource-records create fqdn=maas.io rrtype=mx rrdata='10 smtp.maas.io'
