Commission Nodes
Once a node is added to MAAS (see Add nodes) the next logical step is to commission it.
To commission, the underlying machine needs to be configured to netboot (this should already have been done during the enlistment stage). Such a machine will undergo the following process:
- DHCP server is contacted
- kernel and initrd are received over TFTP
- machine boots
- initrd mounts a Squashfs image ephemerally over iSCSI
- cloud-init runs commissioning scripts
- machine shuts down
The commissioning scripts will talk to the region API server to ensure that everything is in order and that eventual deployment will succeed.
The image used is, by default, the latest Ubuntu LTS release and should not require changing. However, it can be configured in the web UI in the 'Settings' page.
To commission, on the 'Nodes' page, select a node and choose 'Commission' under the 'Take action' dropdown menu (orange button).

You have the option of selecting some extra parameters (checkboxes). Then finalize the directive by hitting 'Go'.

Finalize the directive by hitting 'Commission machine'.
While a node is commissioning its status will change to Commissioning. During this time the node's network topology will be discovered. This will prompt one of the node's network interfaces to be connected to the fabric, VLAN, and subnet combination that will allow it to be configured. By default, a static IP address will be assigned out of the reserved IP range for the subnet. That is, an IP assignment mode of 'Auto assign' will be used. See the next section for details on assignment modes.
See MAAS CLI for how to commission a node with the CLI.
Note: If your node has more than one network interface you may need to tell MAAS which one to use. Do this by marking it Broken (see next section).
Once a node is commissioned its status will change to Ready. Consider taking this time to tag your node (see Tags).
The next step will be to deploy it. See Deploy nodes.
Post-commission configuration
Once a node has been commissioned, its network interface(s) can be configured. Specifically, when a node's status is either 'Ready' or 'Broken', interfaces can be added/removed, attached to a fabric and linked to a subnet, and provided an IP assignment mode. Tags can also be assigned to specific network interfaces (see Tags for network interfaces).
![node interface][img__node-interface-ip]
There are four modes to choose from that determine how an address on the subnet gets assigned when the node is eventually deployed:
-
Auto assign: MAAS will assign a random static address (
iface eth0 inet
  static
). The pool of available addresses depends on whether the subnet is managed or unmanaged (see Subnet management). -
Static assign: The administrator will specify a static address using a secondary field.
-
DHCP: A dynamic address will be leased via either MAAS-managed DHCP or an external DHCP server.
-
Unconfigured: The interface will be left unconfigured.
See Concepts and terms for the definitions of reserved range types used in MAAS.
Bond interfaces
A bond interface is used to aggregate two or more physical interfaces into a single logical interface. A bond is created by selecting more than one interface and clicking the now-active 'Create bond' button:

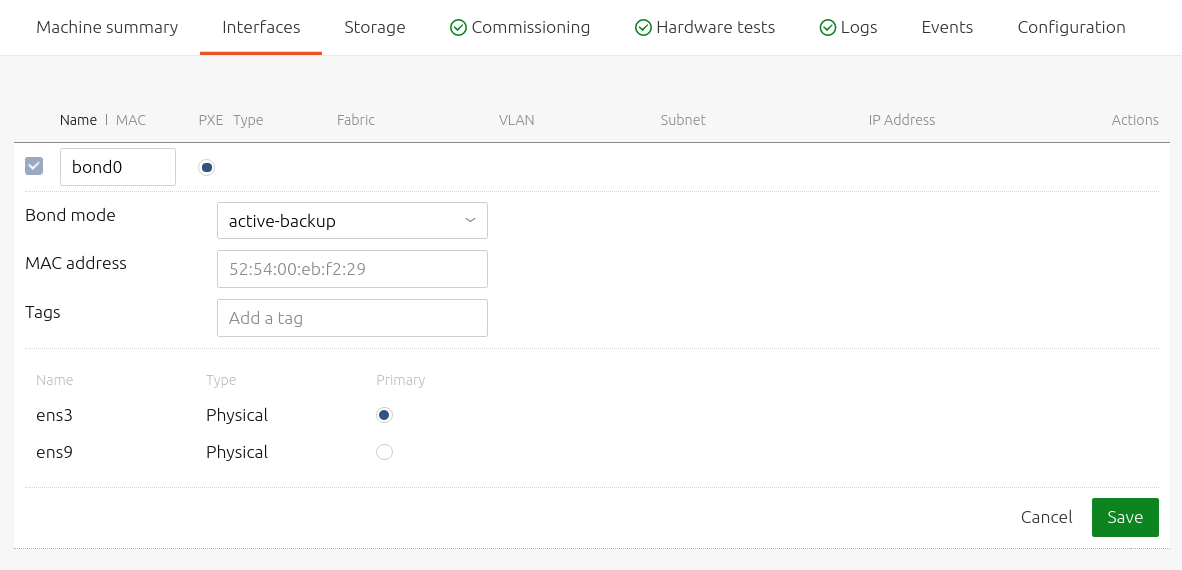
After clicking the 'Create bond' button, the bond configuration pane will appear.
From the bond configuration pane, you can rename the bond, select a bond mode (see below), assign a MAC address to the aggregate device and attach one or more tags.
The interfaces aggregated into the bond interface are listed below the 'Tags' field. Use the 'Primary' column to select the interface to act as the primary device.

The following bonding modes can be selected from the 'Bond mode' drop-down menu:
-
balance-rr: Transmit packets in sequential order from the first available slave through to the last. This mode provides load balancing and fault tolerance.
-
active-backup: Only one slave in the bond is active. A different slave becomes active if, and only if, the active slave fails. The bond's MAC address is externally visible on only one port (network adapter) to avoid confusing the switch.
-
balance-xor: Transmit based on the selected transmit hash policy. The default policy is simple. This means packages are selected by an XOR operation between the source MAC address and the resultant XOR between the destination MAC address the packet type identifier, modulo slave count.
-
broadcast: Transmit everything on all slave interfaces. This mode provides fault tolerance.
-
802.3ad: Creates aggregation groups that share the same speed and duplex settings. Utilises all slaves in the active aggregation according to the IEEE 802.3ad specification.
-
balance-tlb: Adaptive transmit load balancing, channel bonding that does not require any special switch support.
-
balance-alb: Adaptive load balancing, includes balance-tlb plus receive load balancing (rlb) for IPV4 traffic. Does not require any special switch support. The receive load balancing is achieved by ARP negotiation.
Press the 'Save' button when you're done.
Note: The MAC address defaults to the MAC address of the primary interface.
Bridge interfaces
MAAS supports the creation of a bridge interface from a single network interface. This may be useful if you eventually deploy virtual machines or containers on the machine.
A bridge is created by first selecting a single interface followed by clicking the now-enabled 'Create bridge' button. A new pane will appear where you can enter a MAC address for the bridge, an optional STP forward delay, and a tag.
Pro tip: A network bridge may be useful if virtual machines or containers are to be put on the node.
See CLI Interface Management for details on how interfaces can be configured from the command line.
